Lab 1 – Proxmox Validation & Segregation Prep
Validate your existing Proxmox installation, prepare isolated bridges for the homelab, and ensure the existing VM remains outside the lab network.
Objective Lab goal
This lab assumes Proxmox VE is already installed and configured. You will verify host health, create internal bridges for your homelab networks, and confirm that one existing VM remains isolated on the management bridge (vmbr0).
- Outcome 1: Confirm Proxmox host stability and update status.
- Outcome 2: Create internal bridges for lab and security networks.
- Outcome 3: Verify segregation between management and lab networks.
- Outcome 4: Document network layout and exclusions.
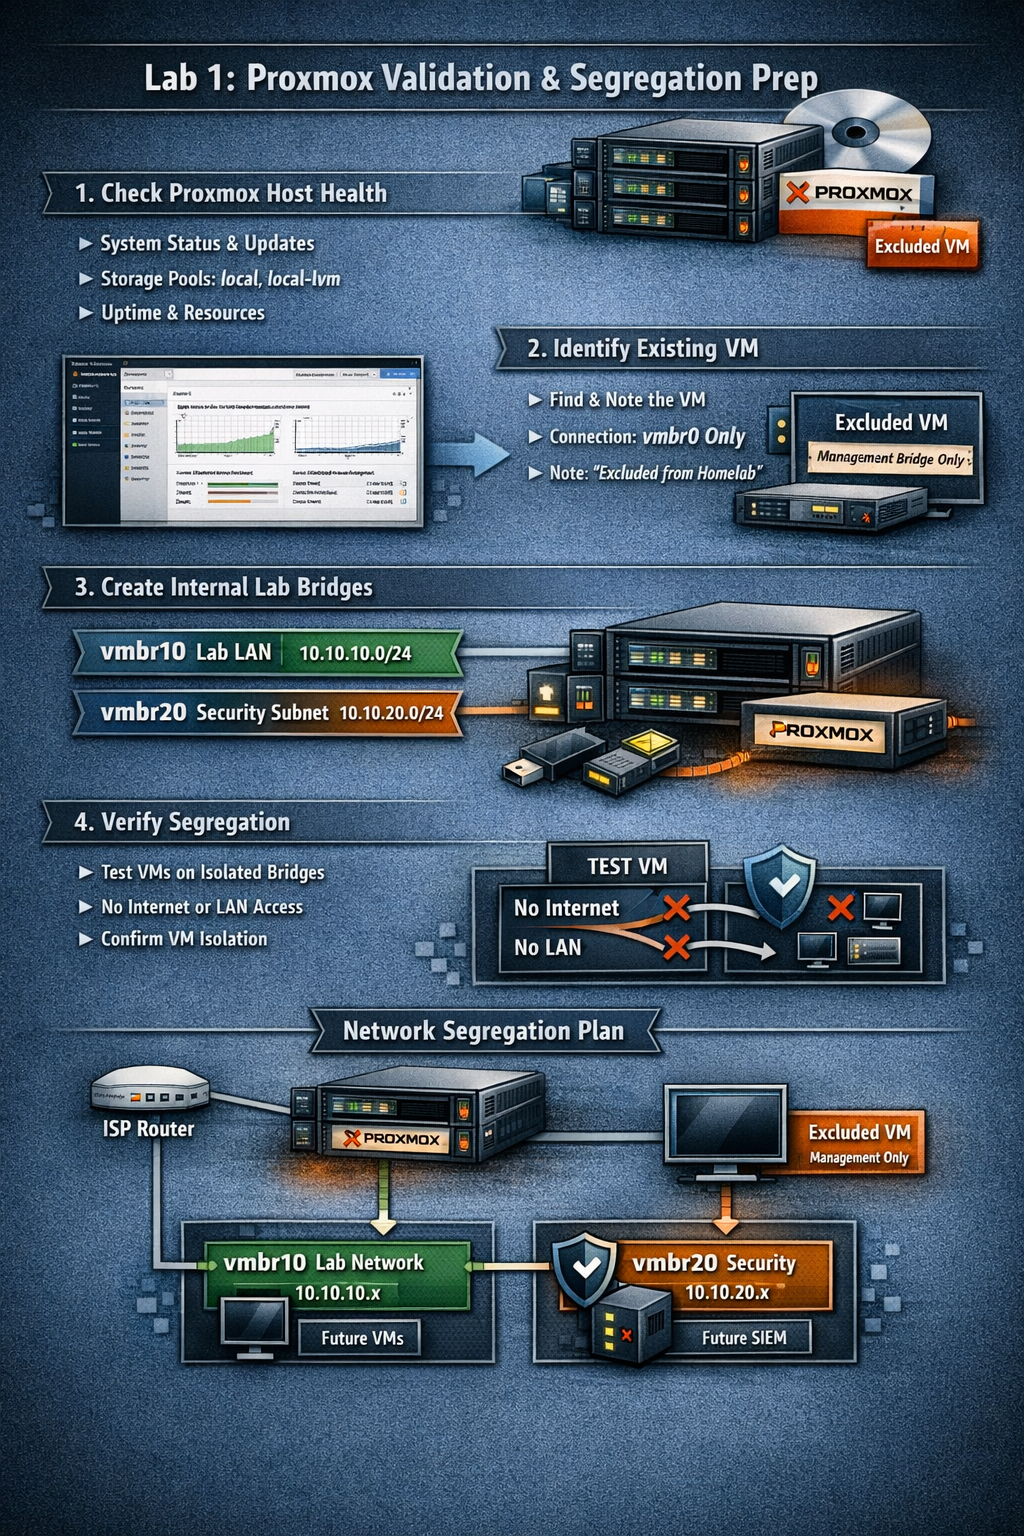
Lab 1: Proxmox validation and segregation prep — verifying host health, creating internal bridges, and isolating the existing VM.
Deliverables End-of-lab checklist
- DL1.1: Verified Proxmox host health and updates applied.
- DL1.2: Internal bridges vmbr10 and vmbr20 created.
- DL1.3: Existing VM confirmed on vmbr0 only.
- DL1.4: Isolation verified between management and lab networks.
- DL1.5: Network diagram saved and documented.
Lab Steps Step-by-step instructions
Step 1 – Validate Host Health
~20 minutes- Log into the Proxmox web UI at https://<proxmox-ip>:8006.
- Check Datacenter → Node → Summary for CPU, RAM, and disk usage.
- Run updates:
apt update && apt dist-upgrade -y
- Reboot if a new kernel was installed.
- Confirm uptime and that all storage pools (local, local-lvm) are online.
Step 2 – Identify Existing VM
~15 minutes- In Datacenter → Node → VMs, locate the existing VM that must remain outside the homelab.
- Note its name, ID, and network interface.
- Ensure its NIC is attached to vmbr0 (management/ISP LAN).
- Add a comment in Options → Notes:
Excluded from homelab network — remains on management bridge.
Step 3 – Create Internal Bridges for Homelab
~30 minutes- Navigate to Node → Network → Create → Linux Bridge.
- Add:
- vmbr10 — Lab LAN (no physical NIC, no IP).
- vmbr20 — Security subnet (no physical NIC, no IP).
- Apply changes and reboot if prompted.
- Verify bridges appear in the network list.
Step 4 – Document Network Segregation Plan
~20 minutes| Bridge | Purpose | IP Range | Connected VMs | Notes |
|---|---|---|---|---|
| vmbr0 | Management / ISP LAN | 192.168.0.0/24 | Existing VM, Proxmox host | External access only |
| vmbr10 | Lab LAN | 10.10.10.0/24 | Future OPNsense LAN, AD, clients | Isolated |
| vmbr20 | Security subnet | 10.10.20.0/24 | Future SIEM, IDS | Isolated |
Step 5 – Verify Isolation
~30 minutes- Create a temporary test VM (e.g., Ubuntu Server) attached to vmbr10.
- Confirm it receives no DHCP from your ISP router (expected).
- Confirm it cannot reach the internet (expected until OPNsense is added).
- Confirm the existing VM on vmbr0 cannot ping the test VM on vmbr10.
- Delete the test VM after verification.
Step 6 – Diagram & Documentation
~30 minutes- Use draw.io or Excalidraw to sketch your network layout.
- Include:
- ISP router → Proxmox host → existing VM (on vmbr0).
- Planned OPNsense VM bridging vmbr0 (WAN) and vmbr10 (LAN).
- Future lab and security subnets (vmbr10, vmbr20).
- Save the diagram as lab1-network-segregation.png in your docs/ folder.
- Record all bridge names, IP ranges, and VM exclusions in your lab notes.
Reflection What you should understand now
- Conceptual: The role of network segregation in protecting your management environment from lab experiments.
- Operational: How to create and verify internal bridges in Proxmox.
- Design: How to isolate existing VMs from new homelab networks while maintaining management access.
You now have a validated Proxmox environment with clear segregation boundaries. The existing VM remains safely outside the homelab network, and your new internal bridges are ready for OPNsense deployment in Week 2.