Lab 2 – OPNsense Deployment & Lab LAN Creation
Deploy OPNsense as a virtual firewall, attach it to Proxmox internal bridges, and create a fully isolated Lab LAN.
Objective Lab goal
In this lab you will deploy OPNsense as a virtual firewall inside Proxmox, attach its WAN interface to the management bridge (vmbr0) and its LAN interface to the isolated lab bridge (vmbr10). You will configure DHCP, verify routing, and ensure the existing VM remains isolated on vmbr0.
- Outcome 1: OPNsense VM deployed with WAN on vmbr0 and LAN on vmbr10.
- Outcome 2: Lab LAN (10.10.10.0/24) fully isolated from ISP LAN.
- Outcome 3: DHCP and routing functional for lab VMs.
- Outcome 4: Existing VM remains untouched on vmbr0.
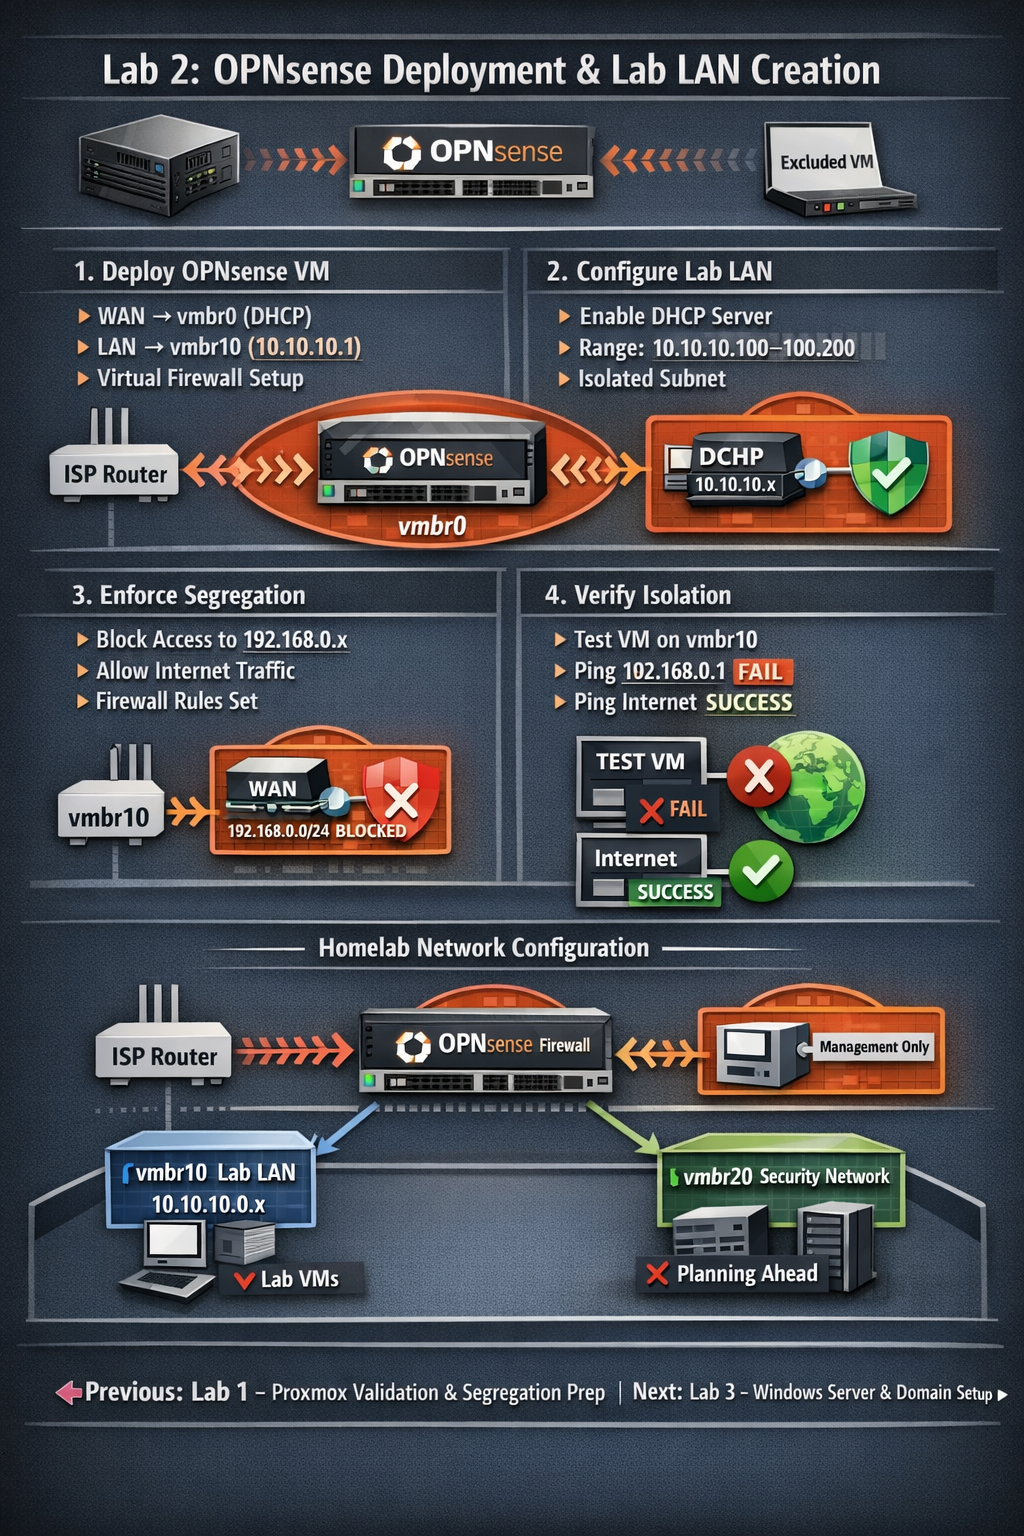
Lab 2: OPNsense deployed as a virtual firewall between vmbr0 (WAN) and vmbr10 (LAN), enabling full lab isolation.
Deliverables End-of-lab checklist
- DL2.1: OPNsense VM installed and reachable via web UI.
- DL2.2: WAN interface receives DHCP from ISP router.
- DL2.3: LAN interface configured as 10.10.10.1/24 with DHCP enabled.
- DL2.4: Test VM on vmbr10 receives DHCP and can reach the internet.
- DL2.5: Lab LAN cannot reach ISP LAN (segregation enforced).
Lab Steps Step-by-step instructions
Step 1 – Download and Upload OPNsense ISO
~10 minutes- Download the latest OPNsense ISO from https://opnsense.org/download/.
- In Proxmox, go to local → ISO Images → Upload.
- Select the OPNsense ISO and upload it.
Step 2 – Create the OPNsense VM
~20 minutes- In Proxmox, click Create VM.
- Assign:
- Name: opnsense-fw
- CPU: 2 vCPUs
- RAM: 4 GB
- Disk: 16–32 GB
- Under OS, select the OPNsense ISO.
- Under Network:
- NIC 1: vmbr0 (WAN)
- NIC 2: vmbr10 (LAN)
- Finish creation and start the VM.
Step 3 – Install OPNsense
~30 minutes- Open the VM console.
- Select Install OPNsense.
- Choose default partitioning.
- Set the root password.
- Reboot when prompted.
Step 4 – Assign Interfaces
~15 minutes- At the console menu, select Assign Interfaces.
- Assign:
- WAN → vmbr0 NIC (DHCP from ISP router)
- LAN → vmbr10 NIC
- Set LAN IP to 10.10.10.1/24.
- Enable DHCP on LAN (range 10.10.10.100–10.10.10.200).
Step 5 – Access OPNsense Web UI
~10 minutes- Create a temporary VM on vmbr10 (Ubuntu or Windows).
- Confirm it receives a DHCP address (10.10.10.x).
- Open a browser and go to https://10.10.10.1.
- Login with root and your password.
Step 6 – Enforce Segregation
~20 minutes- In OPNsense, go to Firewall → Rules → LAN.
- Add a rule:
- Action:
- Add a rule:
- Action: Block
- Source: LAN net
- Destination: 192.168.0.0/24
- Description: Block access to ISP LAN
- Move the rule above the default allow rule.
- From the test VM on vmbr10:
- Ping 192.168.0.1 → FAIL (expected)
- Ping 8.8.8.8 → SUCCESS
- Browse to a website → SUCCESS
Step 7 – Verify Existing VM Isolation
~10 minutes- Ensure the existing VM remains attached to vmbr0 only.
- From the existing VM:
- Ping 10.10.10.1 → FAIL (expected)
- Ping any 10.10.10.x host → FAIL (expected)
- Document results in your lab notes.
Reflection What you should understand now
- Conceptual: How virtual firewalls route and isolate networks inside Proxmox.
- Operational: How to deploy OPNsense and configure WAN/LAN interfaces.
- Security: How to enforce strict segmentation between management and lab networks.
Your homelab now has a fully functional virtual firewall and an isolated Lab LAN. In Week 3, you will deploy Windows Server and begin building your internal domain.
OPNsense acting as the gateway between vmbr0 (WAN) and vmbr10 (LAN), enforcing full isolation.