Lab 3 – Windows Server Deployment & Domain Setup
Deploy Windows Server on the isolated Lab LAN, promote it to a domain controller, and establish the core identity layer for your homelab.
Objective Lab goal
In this lab, you will deploy a Windows Server VM on the isolated Lab LAN (vmbr10), configure static addressing, install Active Directory Domain Services, and promote the server to a domain controller. This forms the identity backbone for all future labs.
- Outcome 1: Windows Server VM deployed on vmbr10.
- Outcome 2: Static IP assigned (10.10.10.x).
- Outcome 3: AD DS installed and domain created.
- Outcome 4: DNS configured and validated.
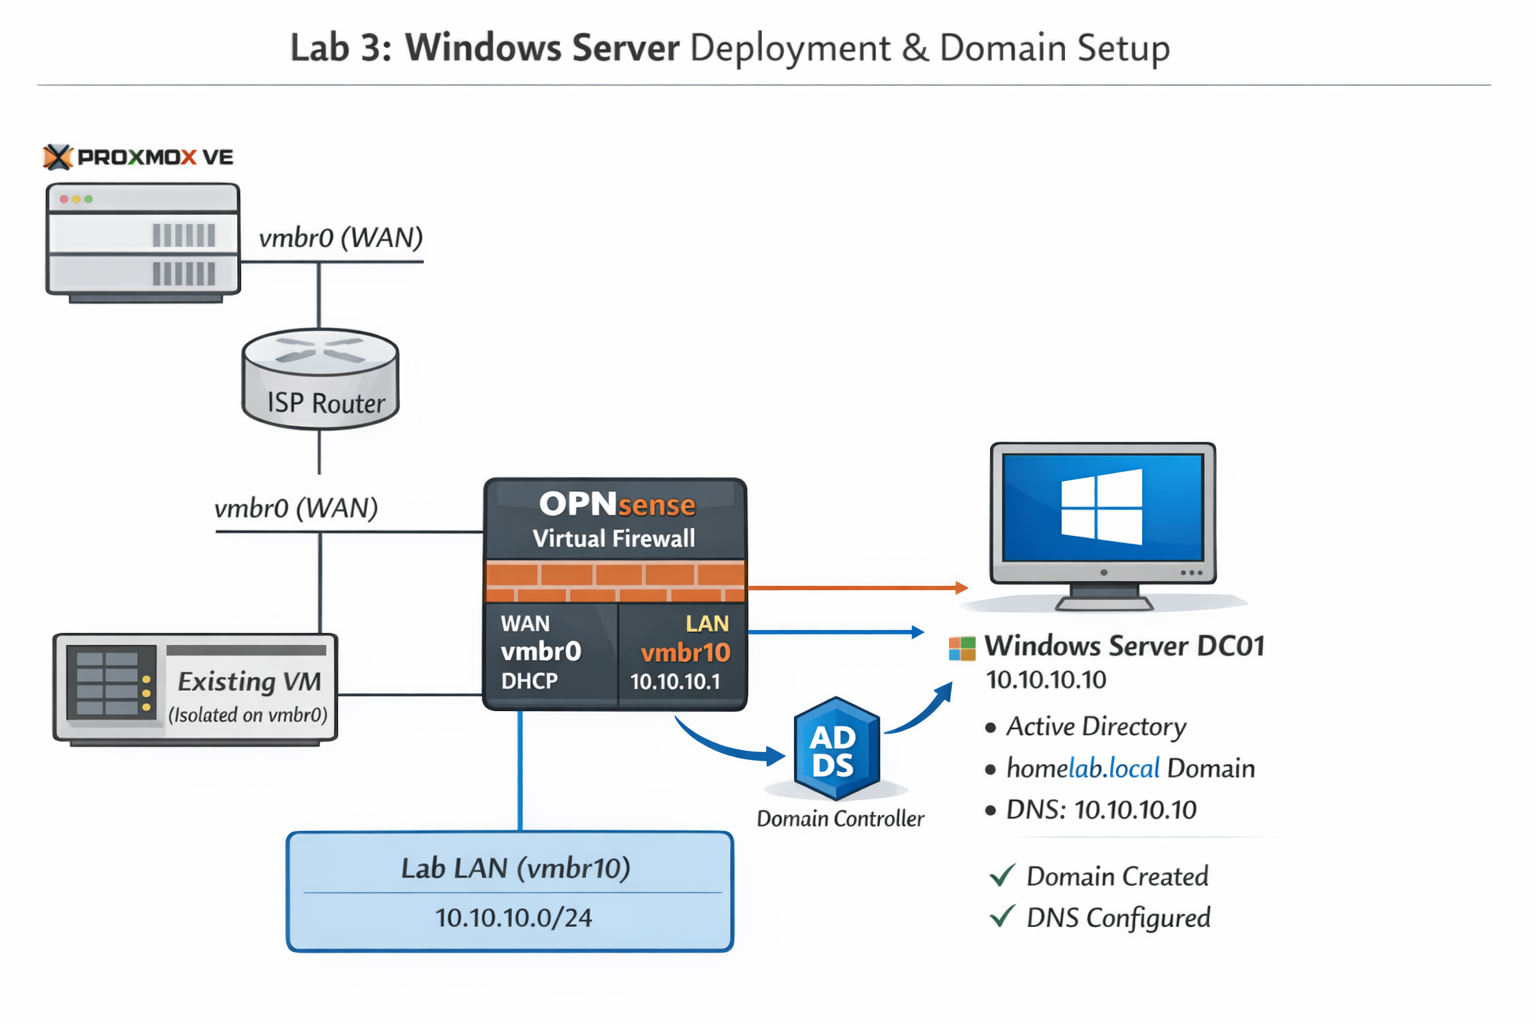
Lab 3: Deploying Windows Server on vmbr10 and promoting it to a domain controller for the homelab.
Deliverables End-of-lab checklist
- DL3.1: Windows Server VM installed and reachable.
- DL3.2: Static IP assigned (10.10.10.10 recommended).
- DL3.3: Domain created (e.g., homelab.local).
- DL3.4: DNS functional and authoritative.
- DL3.5: Domain admin account created.
Lab Steps Step-by-step instructions
Step 1 – Upload Windows Server ISO
~10 minutes- Download Windows Server 2019 or 2022 ISO from Microsoft Evaluation Center.
- In Proxmox, go to local → ISO Images → Upload.
- Upload the ISO.
Step 2 – Create the Windows Server VM
~20 minutes- Click Create VM.
- Assign:
- Name: DC01
- CPU: 2–4 vCPUs
- RAM: 4–8 GB
- Disk: 60–80 GB
- Under Network, attach NIC to vmbr10 (Lab LAN).
- Finish creation and start the VM.
Step 3 – Install Windows Server
~30–40 minutes- Open the VM console.
- Install Windows Server with Desktop Experience.
- Set the local Administrator password.
Step 4 – Assign Static IP
~10 minutes- Open Network & Internet Settings.
- Set:
- IP: 10.10.10.10
- Mask: 255.255.255.0
- Gateway: 10.10.10.1 (OPNsense LAN)
- DNS: 10.10.10.10 (self, after promotion)
Step 5 – Install Active Directory Domain Services
~20 minutes- Open Server Manager.
- Click Add Roles and Features.
- Select Active Directory Domain Services.
- Install the role.
Step 6 – Promote Server to Domain Controller
~20 minutes- In Server Manager, click the yellow flag → Promote this server to a domain controller.
- Select Add a new forest.
- Enter domain name: homelab.local
- Set DSRM password.
- Accept defaults and install.
- Server will reboot automatically.
Step 7 – Validate DNS & Domain Health
~10 minutes- Log in using: HOMELAB\\Administrator
- Open PowerShell and run:
dcdiag /v
- Verify DNS service is running.
- Ensure the server’s DNS is set to itself (10.10.10.10).
Reflection What you should understand now
- Identity: How AD DS provides authentication and authorization.
- Networking: Why domain controllers require static IPs and DNS self‑reference.
- Security: How identity becomes the backbone of blue‑team operations.
Your homelab now has a fully functional domain controller. In Week 4, you will deploy a Windows 10 client and join it to the domain.