Lab 4 – Windows Client Deployment & Domain Join
Deploy a Windows 10 client VM on the Lab LAN, configure networking, and join it to the homelab.local domain created in Week 3.
Objective Lab goal
This lab extends your homelab’s identity infrastructure by adding a Windows 10 client to the domain. You’ll configure the VM, verify DHCP and DNS resolution through OPNsense and DC01, and confirm successful domain join and policy inheritance.
- Outcome 1: Windows 10 VM deployed on vmbr10.
- Outcome 2: DHCP and DNS verified via OPNsense and DC01.
- Outcome 3: Client joined to homelab.local.
- Outcome 4: Group Policy and authentication validated.
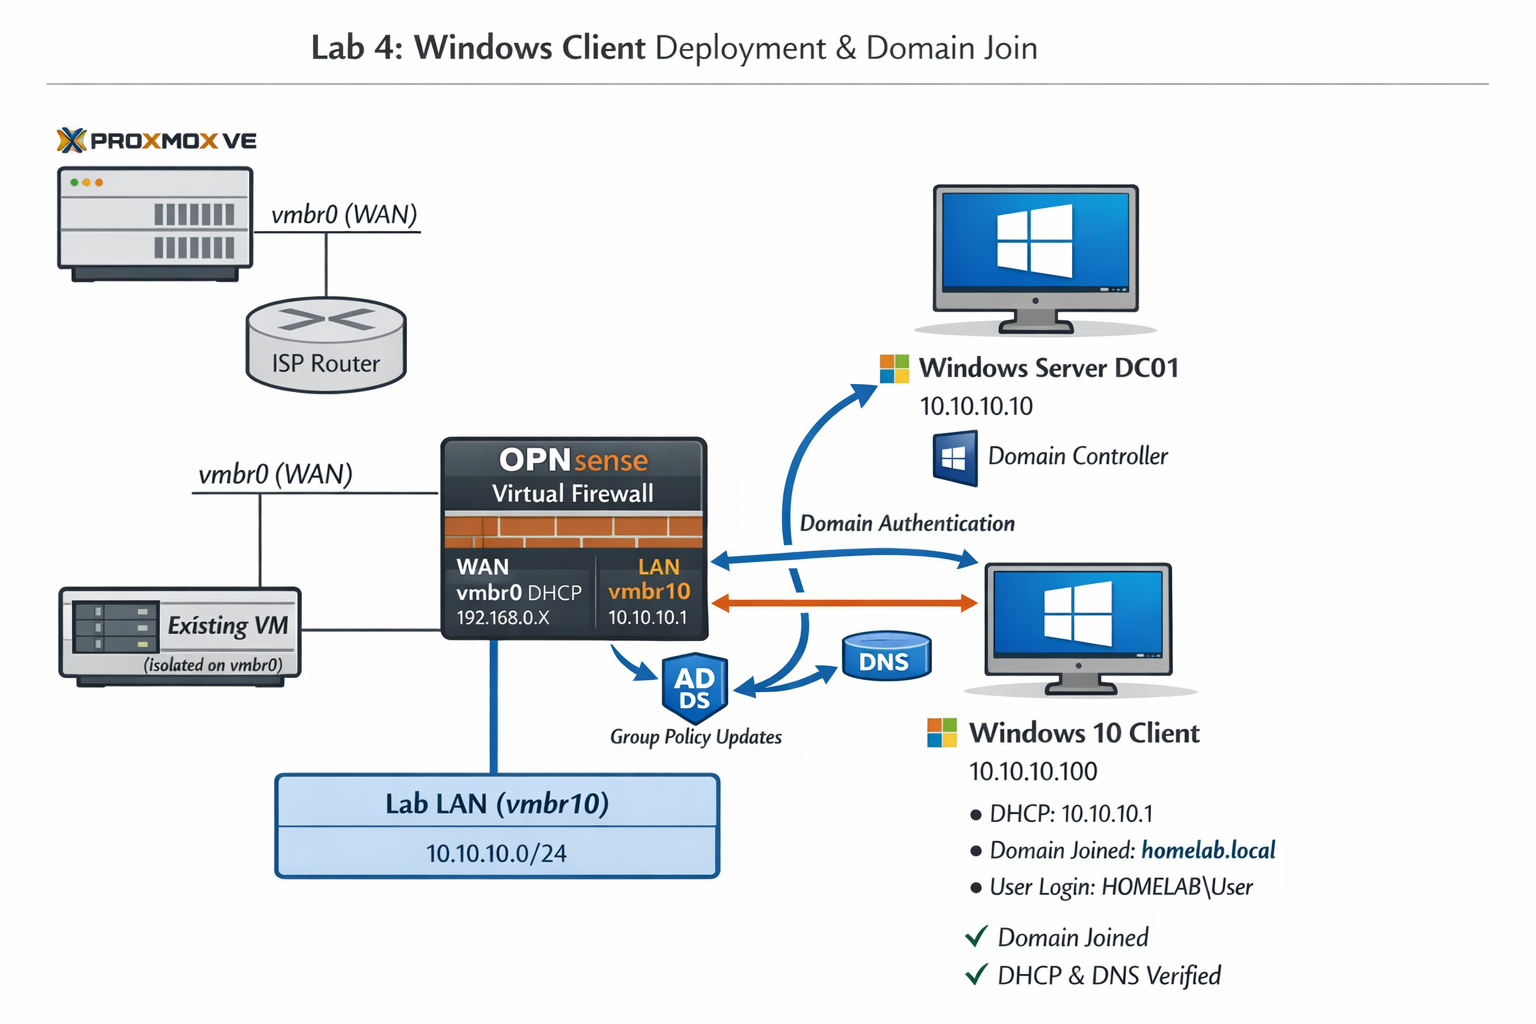
Lab 4: Deploying a Windows 10 client on vmbr10 and joining it to the homelab.local domain.
Deliverables End‑of‑lab checklist
- DL4.1: Windows 10 VM installed and reachable.
- DL4.2: DHCP lease obtained from OPNsense.
- DL4.3: DNS resolution confirmed via DC01.
- DL4.4: Domain join successful.
- DL4.5: Group Policy applied and verified.
Lab Steps Step‑by‑step instructions
Step 1 – Upload Windows 10 ISO
~10 minutes- Download the latest Windows 10 ISO from Microsoft.
- In Proxmox, go to local → ISO Images → Upload.
- Upload the ISO for use in VM creation.
Step 2 – Create the Windows 10 VM
~20 minutes- Click Create VM.
- Assign:
- Name: WIN10‑LAB
- CPU: 2 vCPUs
- RAM: 4 GB
- Disk: 40 GB
- Attach NIC to vmbr10 (Lab LAN).
- Finish creation and start the VM.
Step 3 – Install Windows 10
~30–40 minutes- Open the VM console and boot from the ISO.
- Install Windows 10 Pro.
- Set a local Administrator password.
Step 4 – Verify DHCP and DNS
~10 minutes- Open PowerShell and run:
ipconfig /all
- Confirm:
- IP address → 10.10.10.x (from OPNsense DHCP).
- Gateway → 10.10.10.1.
- DNS → 10.10.10.10 (DC01).
- Test DNS:
nslookup dc01.homelab.local
- Ping DC01 → should succeed.
Step 5 – Join the Domain
~15 minutes- Open System Properties → Computer Name → Change.
- Select Domain and enter: homelab.local
- When prompted, enter domain credentials: HOMELAB\\Administrator and password.
- Restart the VM.
- Log in using domain credentials.
Step 6 – Verify Group Policy and Authentication
~15 minutes- Log in using a domain account (e.g., HOMELAB\\Administrator).
- Open PowerShell and run:
gpresult /r
- Confirm that domain policies are applied.
- Open System Properties → Remote Settings and verify that domain users can be added to Remote Desktop Users.
- Test authentication:
- Lock the workstation and log in again using domain credentials.
- Ensure successful authentication via DC01.
Reflection What you should understand now
- Identity: How endpoints authenticate against a domain controller.
- Networking: How DHCP and DNS coordinate across OPNsense and DC01.
- Security: How Group Policy enforces configuration and access control.
Your homelab now includes a functioning Windows 10 client joined to the homelab.local domain. In Week 5, you’ll begin implementing baseline hardening and endpoint monitoring.